> For the complete documentation index, see [llms.txt](https://docs.greennode.ai/llms.txt). Markdown versions of documentation pages are available by appending `.md` to page URLs; this page is available as [Markdown](https://docs.greennode.ai/vserver/compute-hcm03-1a/vpc/virtual-ip/public-virtual-ip-address-for-vmarketplace.md).
# Public Virtual IP Address for vMarketplace
## I. Purpose
Virtual IP is mainly used to:
**1. Ensure High Availability (HA)**
* If the primary server fails, the VIP moves to the standby server.
* The service stays online. Users are not interrupted.
**2. Load balancing**
* Distribute traffic to multiple backend servers.
* Improve performance and prevent overload.
**3. Simplify operations**
* Users only connect to one IP.
* Admins can change backends without impacting clients.
## II. Document objectives
This document helps you:
* Understand and use Virtual IP Address(es) on vMarketplace.
* Use pfSense or Palo Alto as an Internet Gateway.
## III. Implementation steps
**1.Standalone Mode (Single Firewall)**
Standalone mode characteristics:
**Pros:**
* Simple configuration. Easy to deploy.
* Lower cost (only one firewall VM).
* Fits dev/test and small workloads.
**Cons:**
* No failover. If the firewall VM fails, connectivity is lost.
* Single Point of Failure (SPOF).
* Downtime during maintenance or firewall restarts.
**Traffic flow:** Internet → VIP (157.20.200.185) → Firewall VM (NAT + Filter) → Server 1 (192.168.2.7), Server 2 (192.168.2.5)
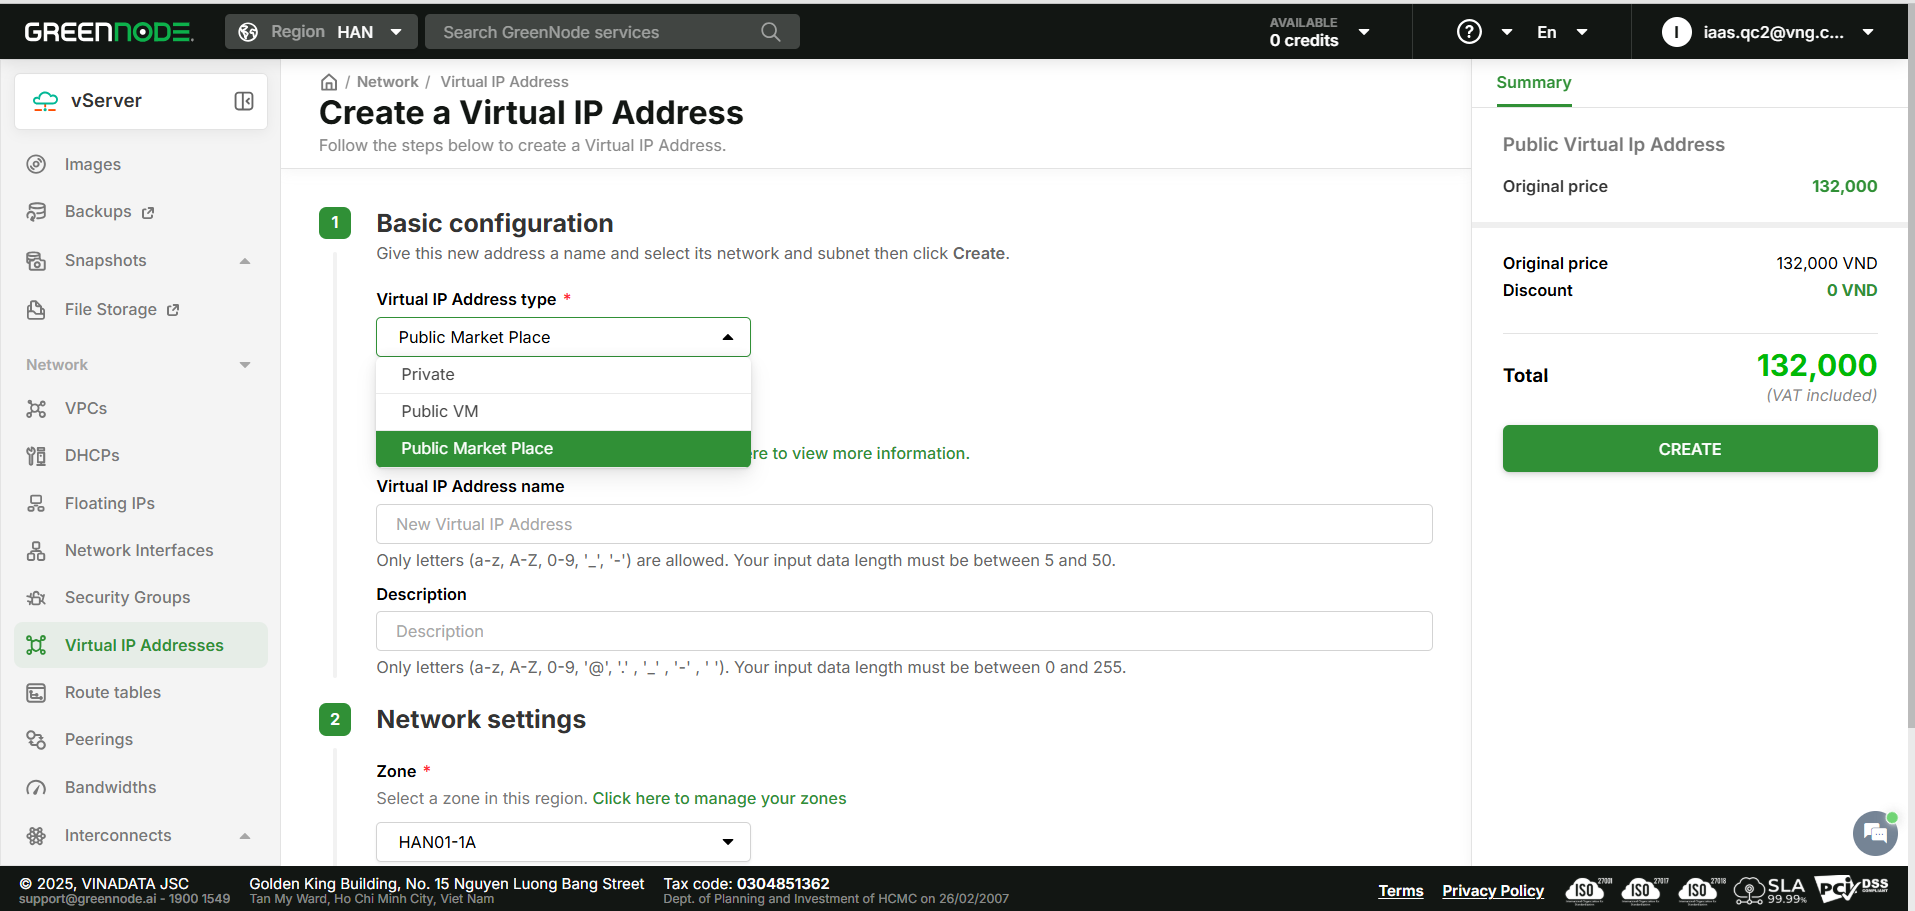
**Step 1: Create a Virtual IP Address in the GreenNode portal**
Go to [vServer Portal - Create-virtual-ip-address](https://hcm-3.console.greennode.ai/vserver/network/virtual-ip-address).\
Select **Virtual IP Address type** = **Public Market Place**.\
Fill in the required information.
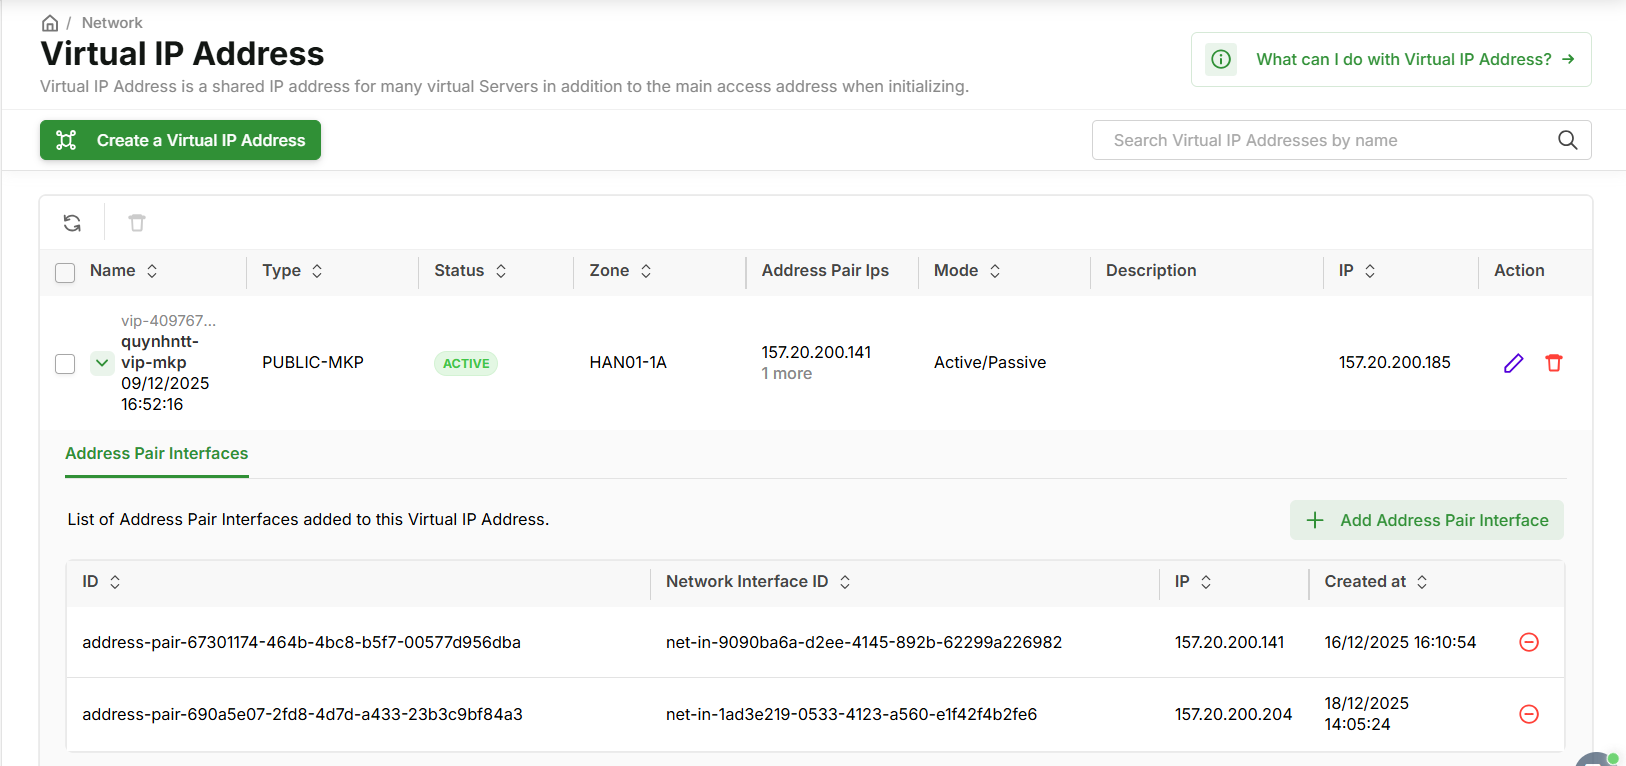
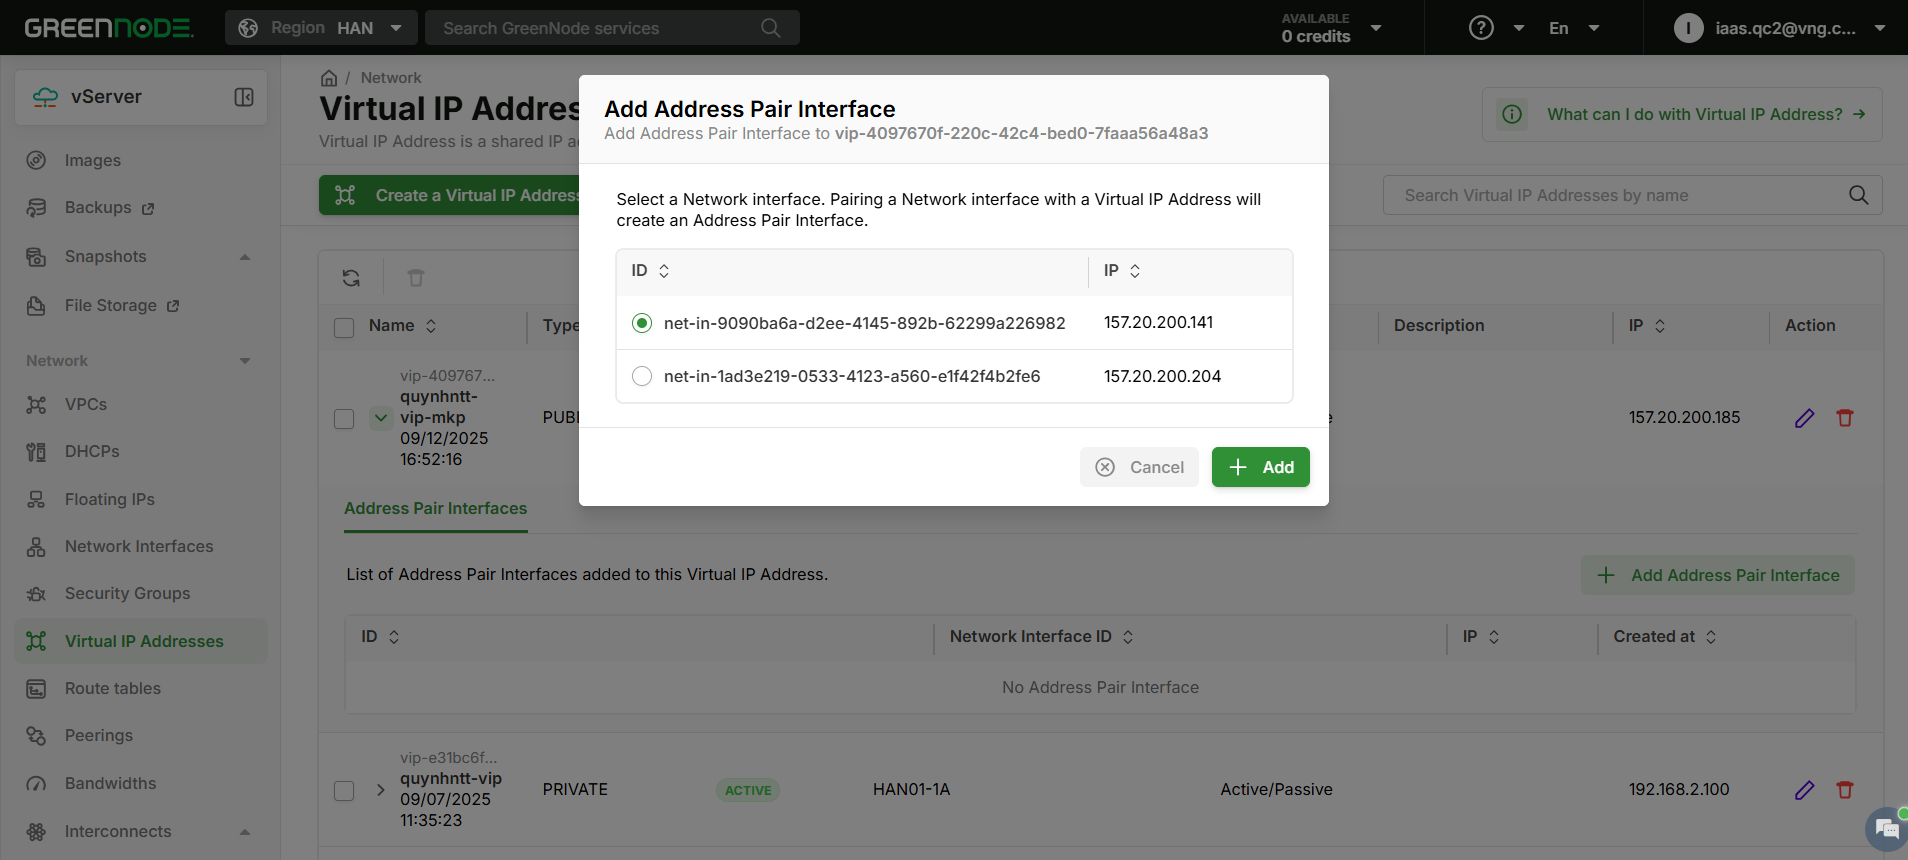
**Step 2: Allow an address pair for the VIP with the Marketplace external IP**
After creating the Public Marketplace VIP, allow the address pair.\
Click **Add Address Pair Interface**.\
In the popup, choose the pfSense **External IP Marketplace**.
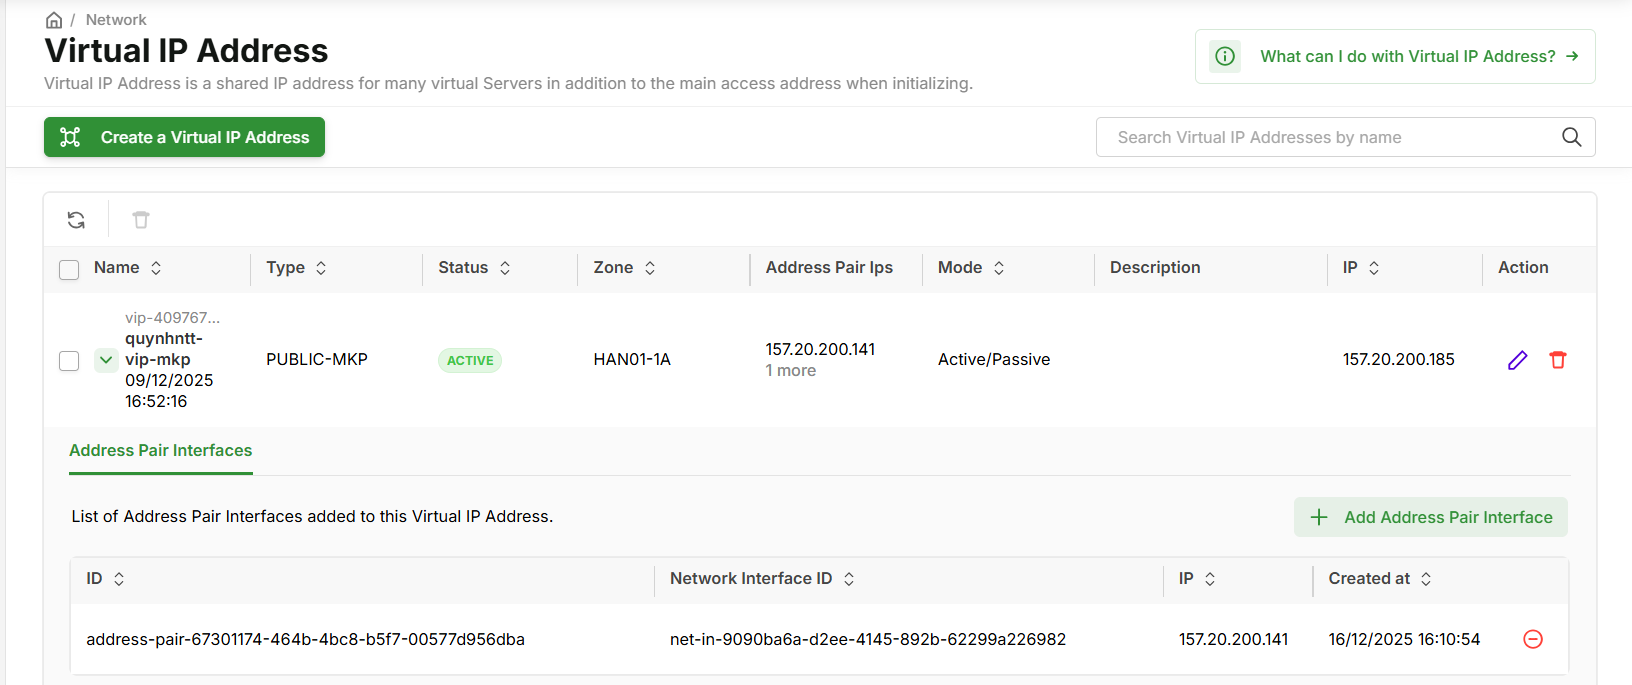
Verify the address pair was added successfully.
\*Note: Save the VIP value. You will use it inside pfSense later.
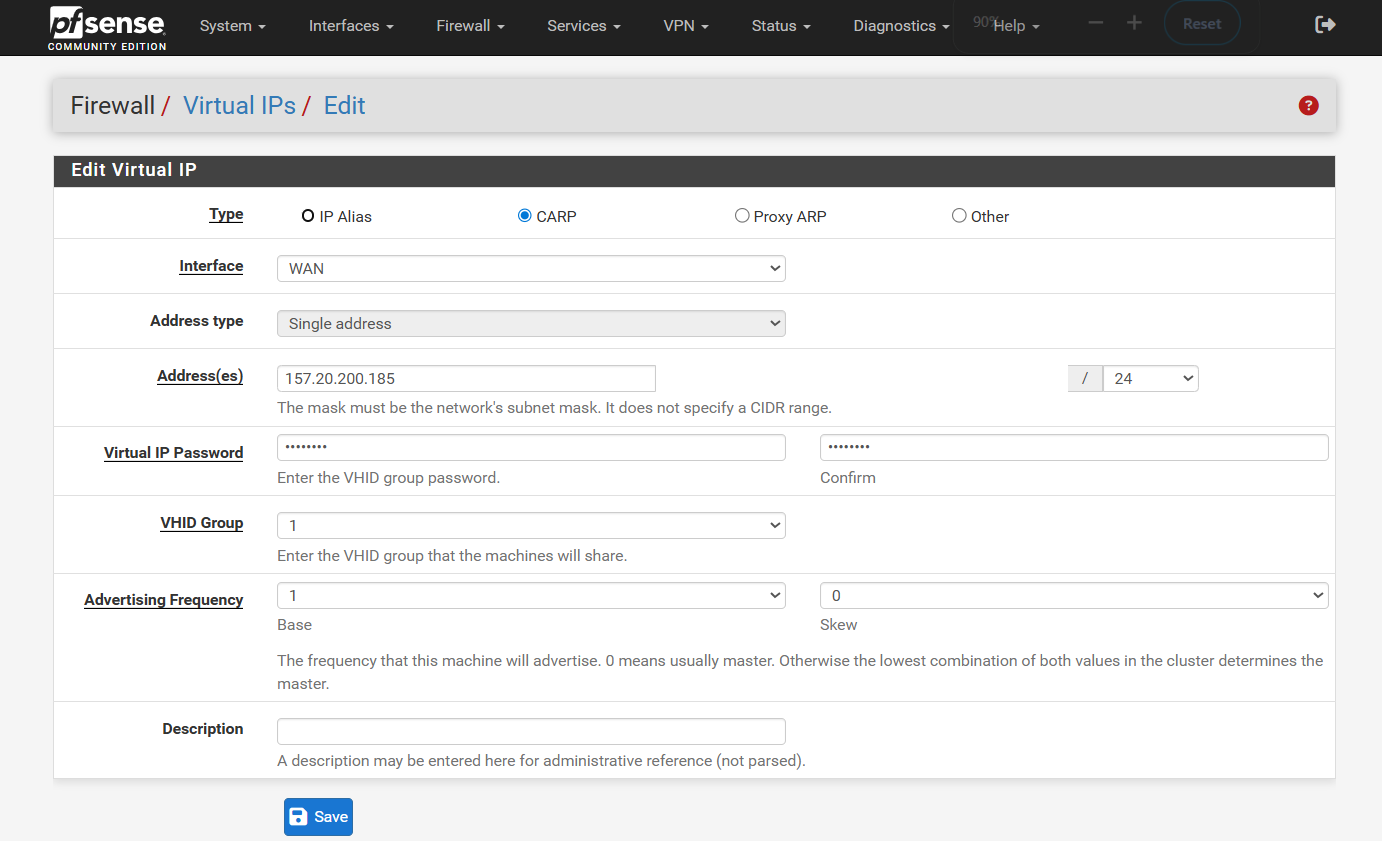
**Step 3: Create the VIP in pfSense**
In the pfSense webGUI, go to **Firewall → Virtual IPs**.\
Click **Add**.
Fill in the required fields.
\*For **Address(es)**, enter the VIP created in the GreenNode portal in Step 2.
Verify the VIP in pfSense.
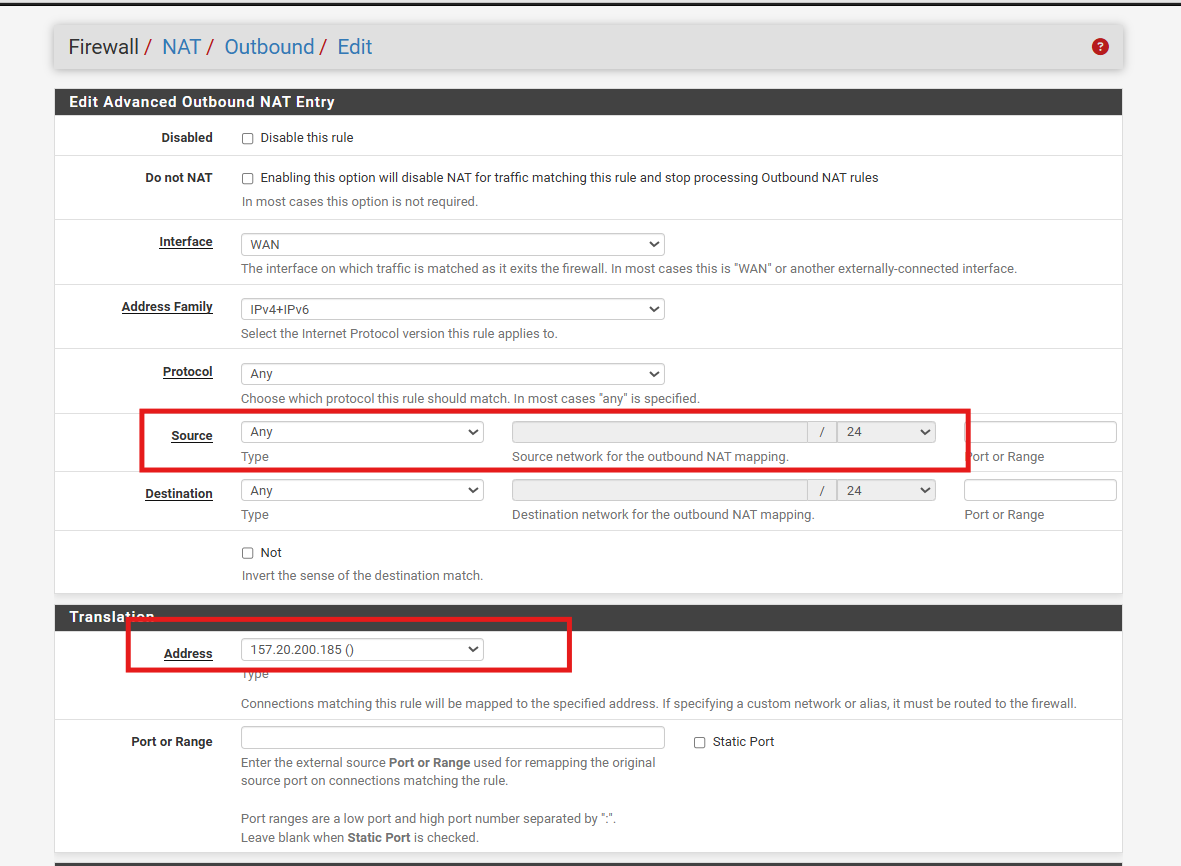
**Step 4: Create an outbound NAT rule to egress to the Internet via a specific IP**
1. Switch to **Manual Outbound NAT** mode.
2. Create a NAT rule.
3. Configure the NAT rule.
Rule requirement:
Server 1 (192.168.2.7) and Server 2 (192.168.2.5) are behind pfSense.\
They must egress to the Internet using VIP **157.20.200.185**.
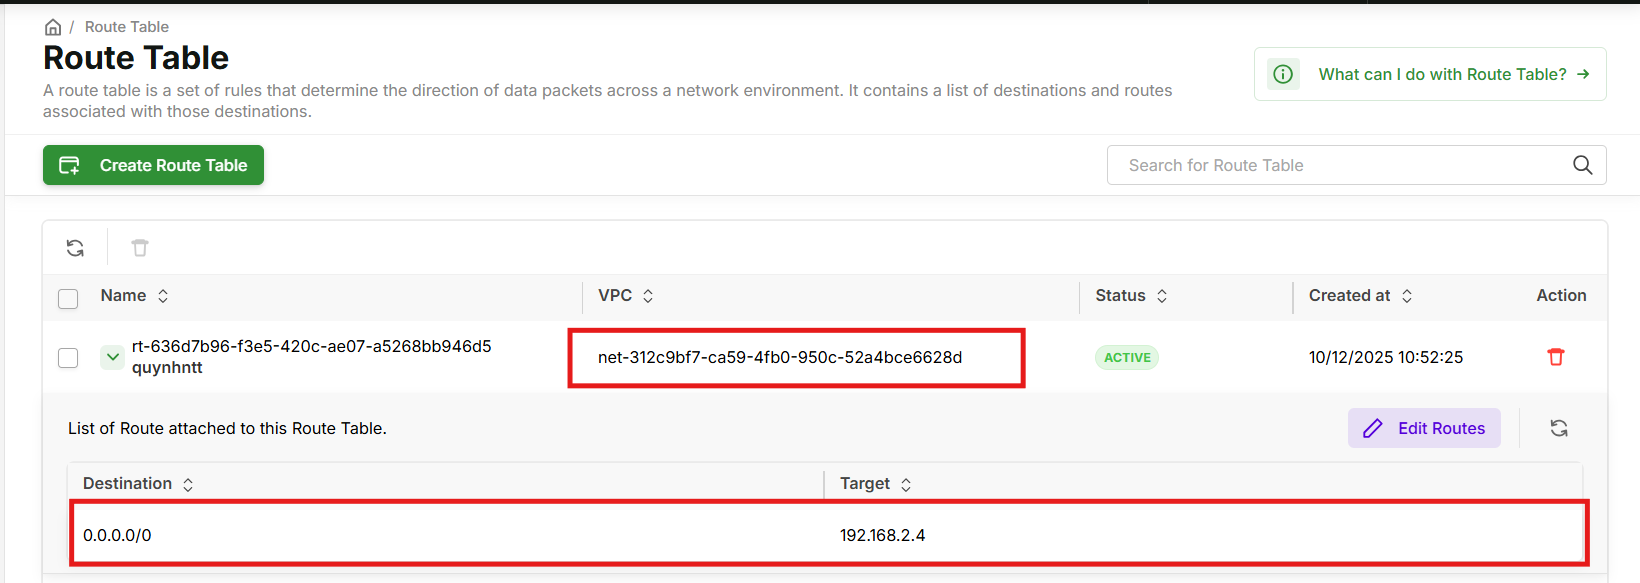
4. **Create a route table**
Select the VPC that contains the pfSense firewall and the internal servers.
Add a route rule with:
* **Destination**: `0.0.0.0/0` (Internet)
* **Target**: `192.168.2.4` (pfSense internal interface IP)
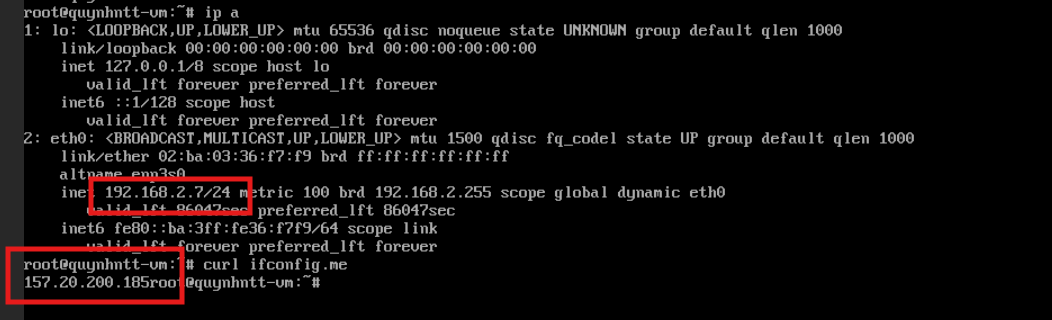
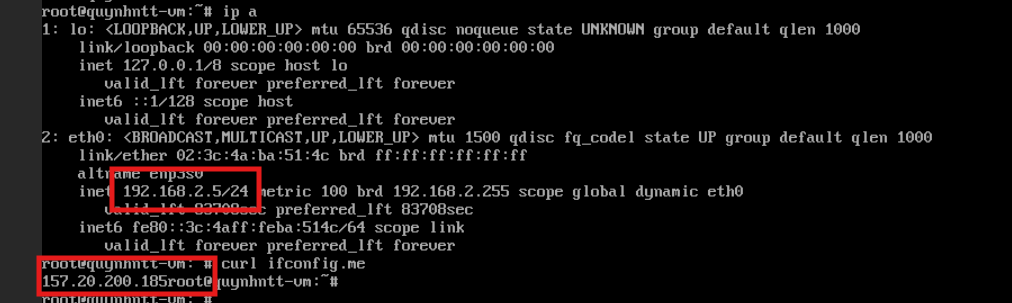
**Step 5: Verify**
Log in to both servers (192.168.2.7 and 192.168.2.5).\
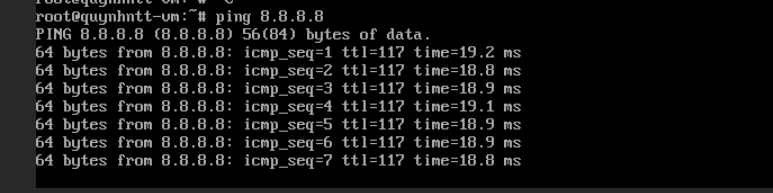
Run `curl ifconfig.me` to verify the public egress IP.
At this point, both servers reach the Internet using the VIP.\
All outbound traffic goes through pfSense.\
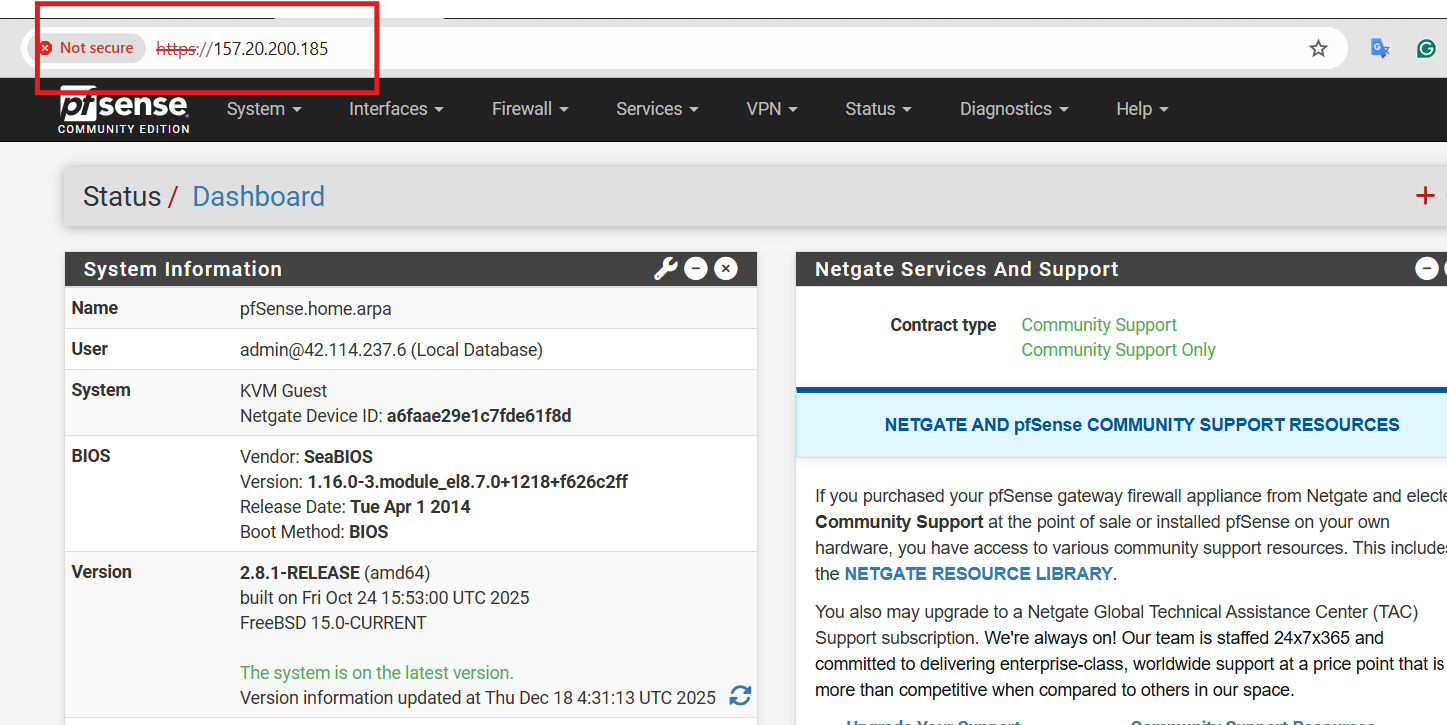
You can also access the pfSense webGUI via this VIP.
**2.High Availability (HA) Mode (2+ Firewall VM)**
**a. Characteristics**
* The VIP is shared between **two or more firewalls**.
* Automatic failover is supported.
**b. When to use**
* Production environments.
* Mission-critical services (downtime is not acceptable).
* High SLA requirements (99.9% uptime or higher).
**Pros:**
* If the primary firewall fails, the VIP moves to the backup firewall.
* Near-zero downtime, or minimal downtime (a few seconds).
**Common configurations:**
* **Active-Passive**: one firewall is active, one firewall is standby.
* **Active-Active**: both firewalls are active (combined with load balancing).
**Recommended mode when selecting the firewall deployment model**
* **pfSense**: choose **Active/Active**.
* **Palo Alto**: choose **Active/Passive**.
{% hint style="info" %}
If you deploy **pfSense**, keep the marketplace deployment mode as **Active/Active**, then follow the VIP failover steps below for the public VIP layer.
{% endhint %}
**Traffic flow:** Internet → VIP (157.20.200.185) → Firewall VM 1 (NAT + Filter), Firewall VM 2 (NAT + Filter) → Server 1 (192.168.2.7), Server 2 (192.168.2.5)
**Implementation steps**
**Step 1: Prepare the Virtual IP Address and two pfSense firewall VMs**
Repeat the same setup as **Step 1 → Step 4** in standalone mode:
* Create the VIP.
* Add address pairs.
* Create the VIP inside pfSense.
* Configure outbound NAT and routing.
Note: The Virtual IP Address must be paired with both pfSense external interfaces.
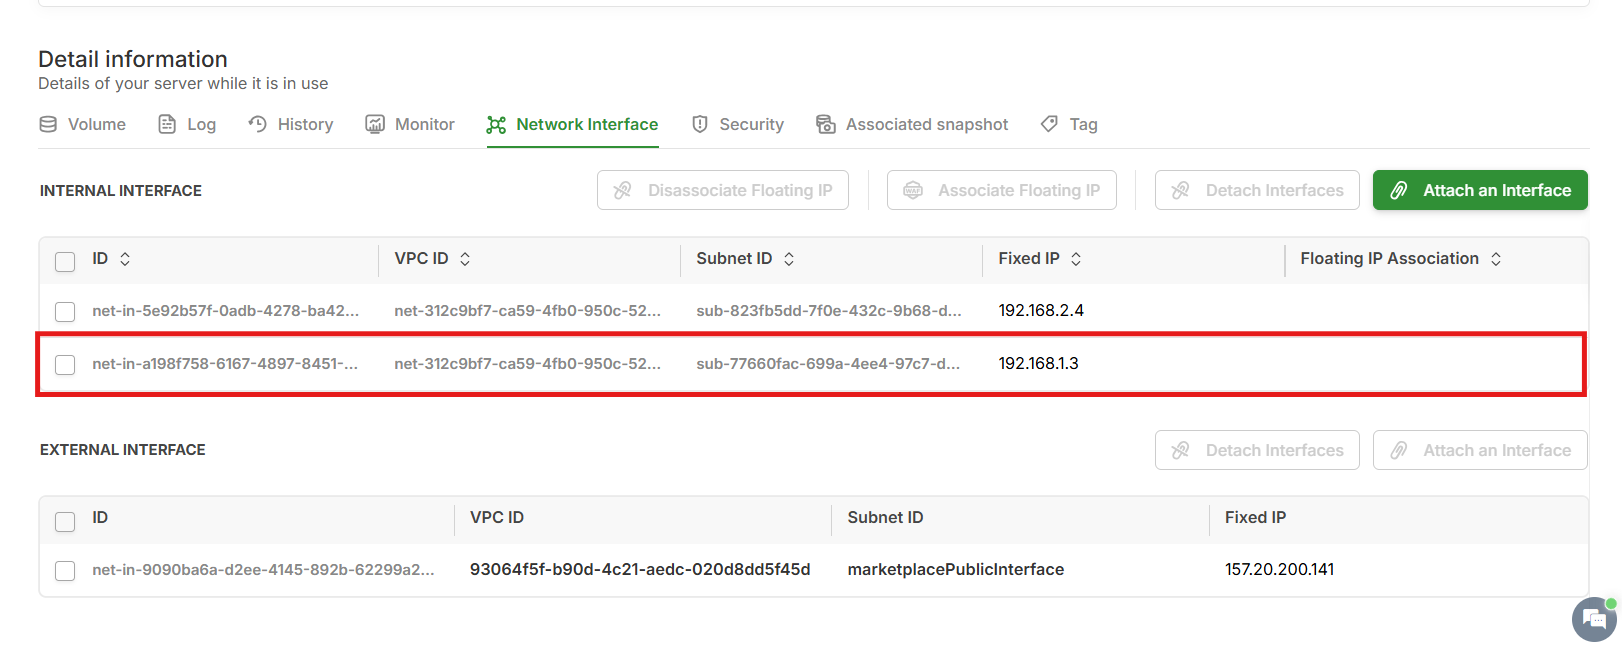
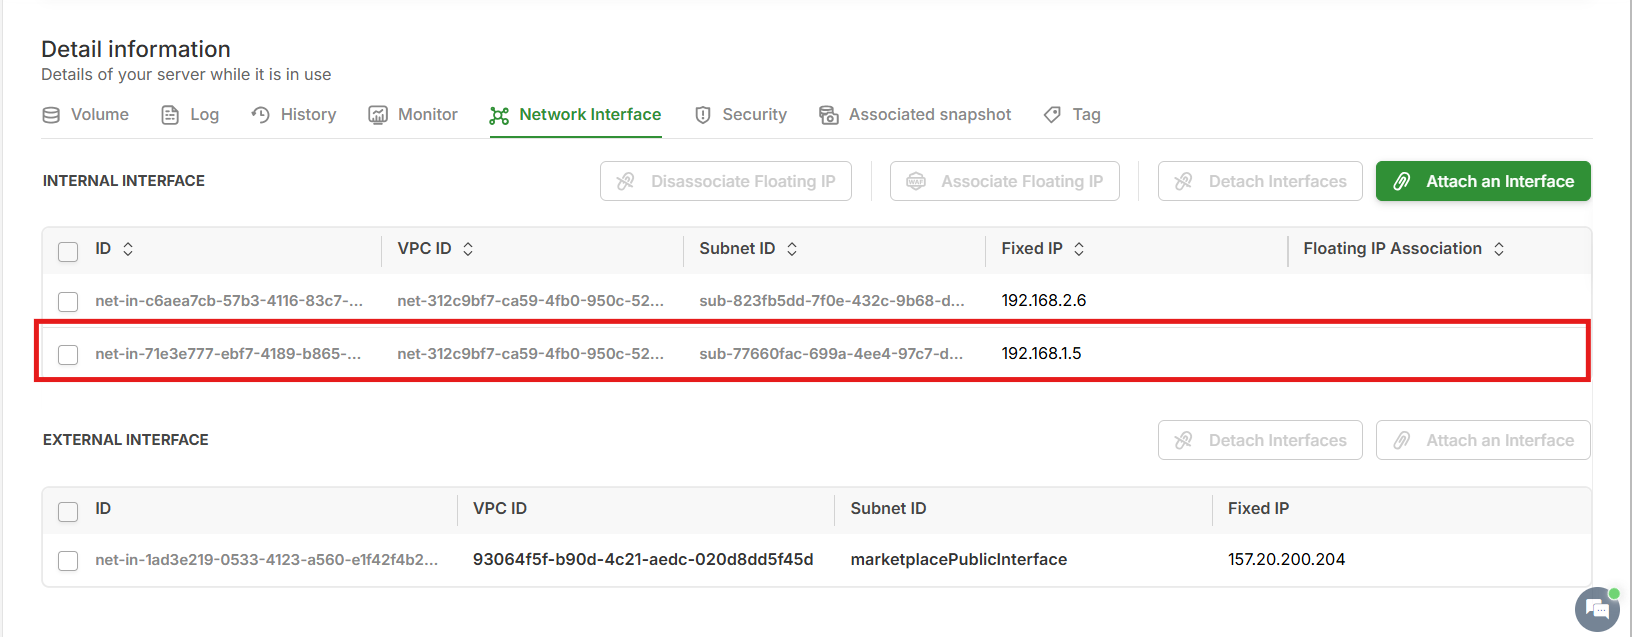
**Step 2: Add an HA internal interface to both pfSense firewall VMs**
In the vServer portal, open each firewall VM details page.\
Add one more **internal interface** to both firewalls.\
Use this interface for HA sync.
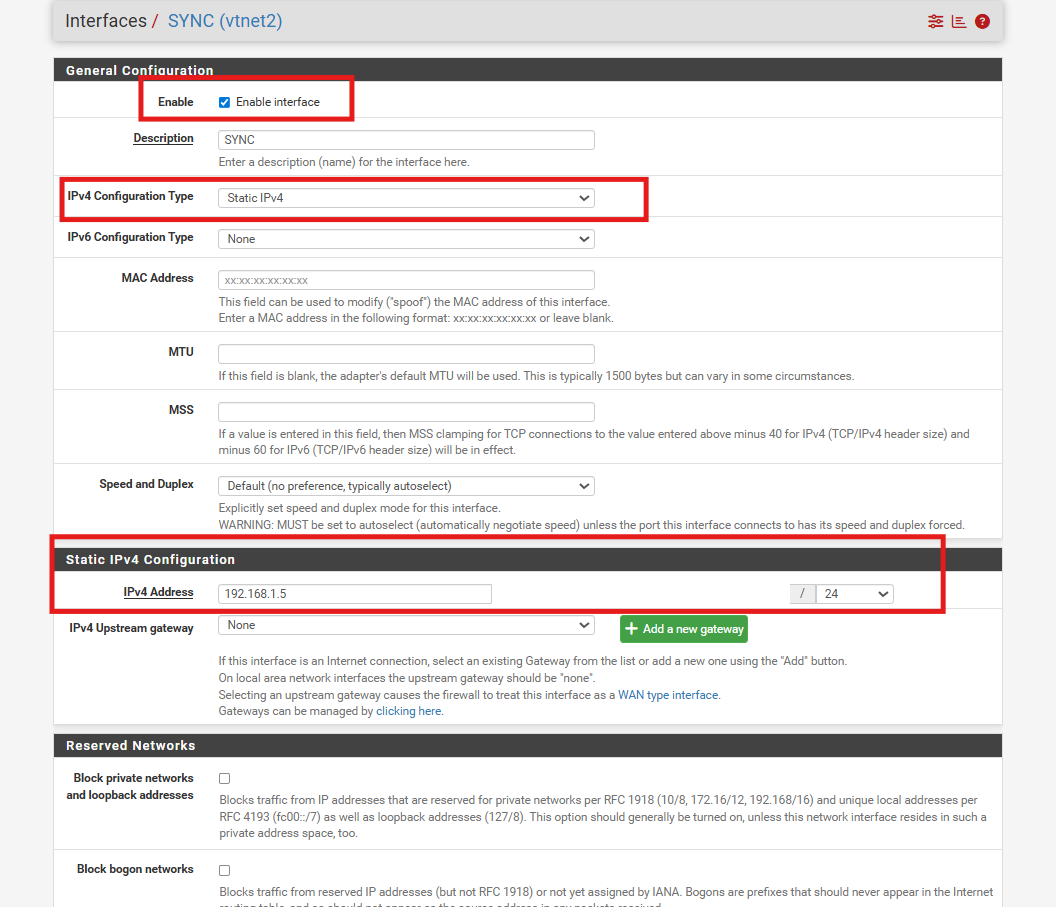
**Step 3: Configure the HA interface on both pfSense firewalls**
In the pfSense webGUI, assign the new interface added from the vServer portal.\
Configure it as shown below.
Set **IPv4 Address** to the HA interface IP from the vServer portal.
Repeat the same configuration on the other pfSense firewall.
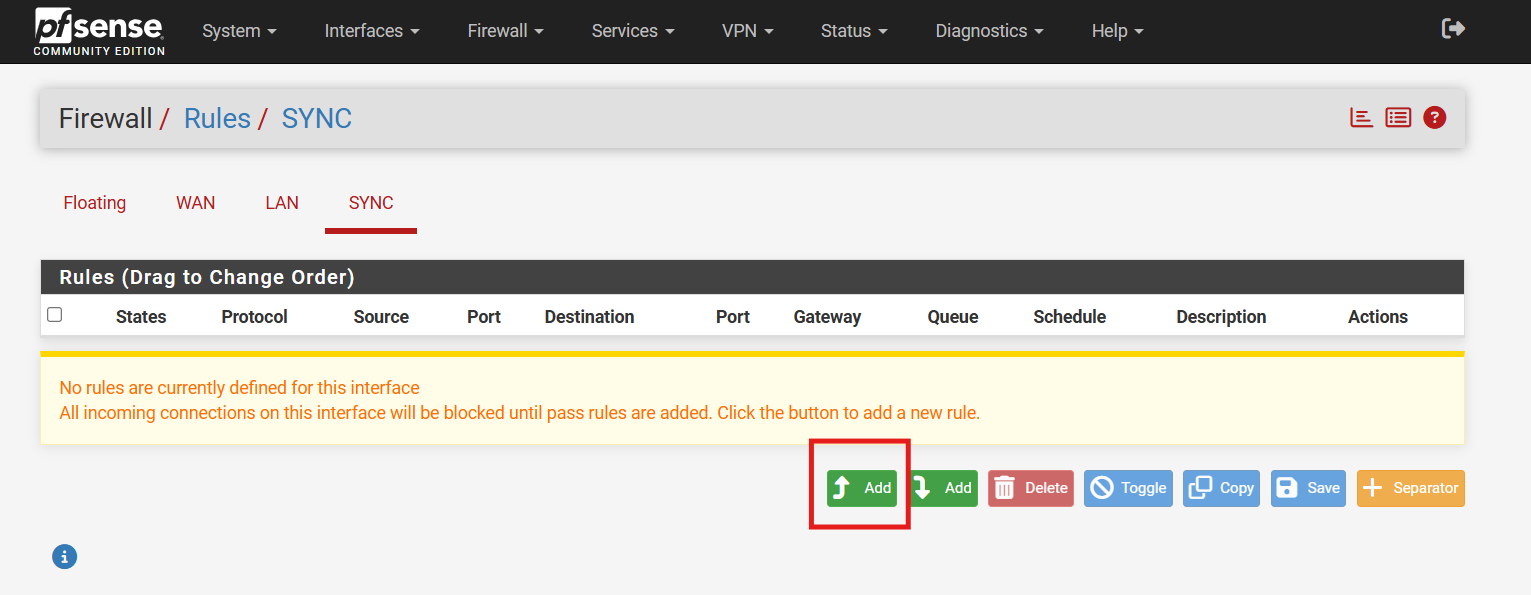
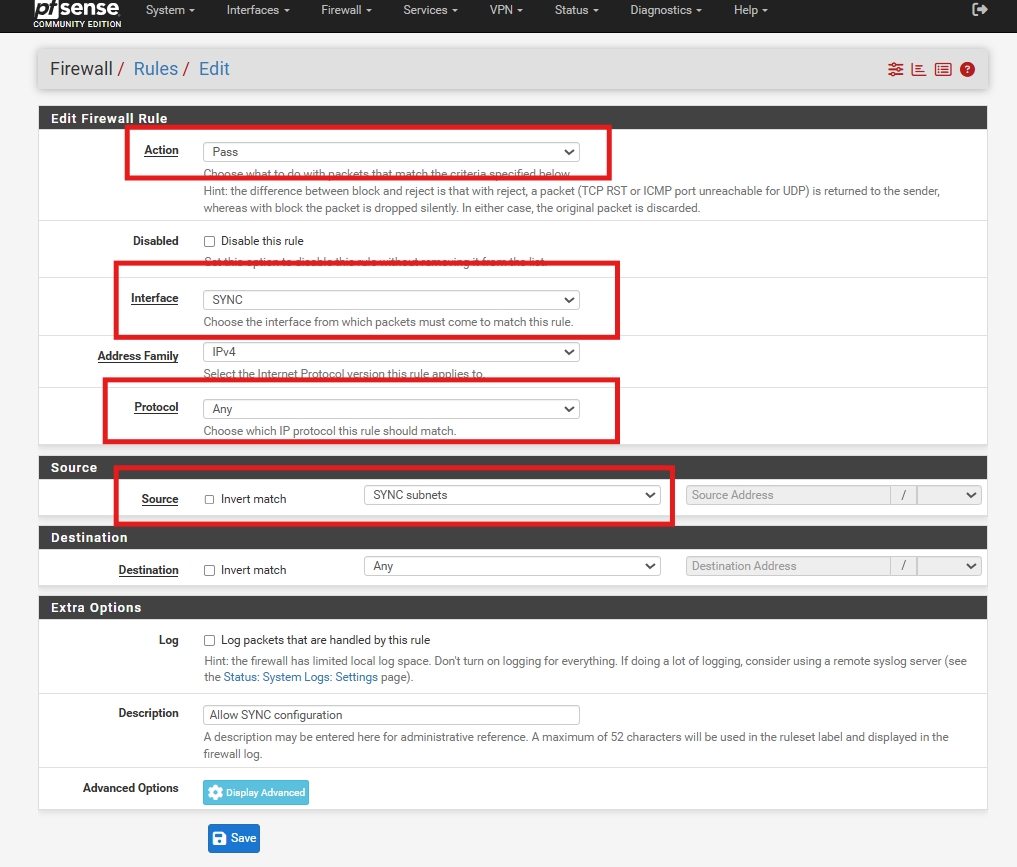
**Step 4: Add firewall rules on the HA interface to allow configuration sync**
In the pfSense webGUI, go to **Firewall → Rules → SYNC** (or your HA interface name).\
Click **Add**.
Configure the rule as shown below.
Repeat the same rule on the backup firewall.
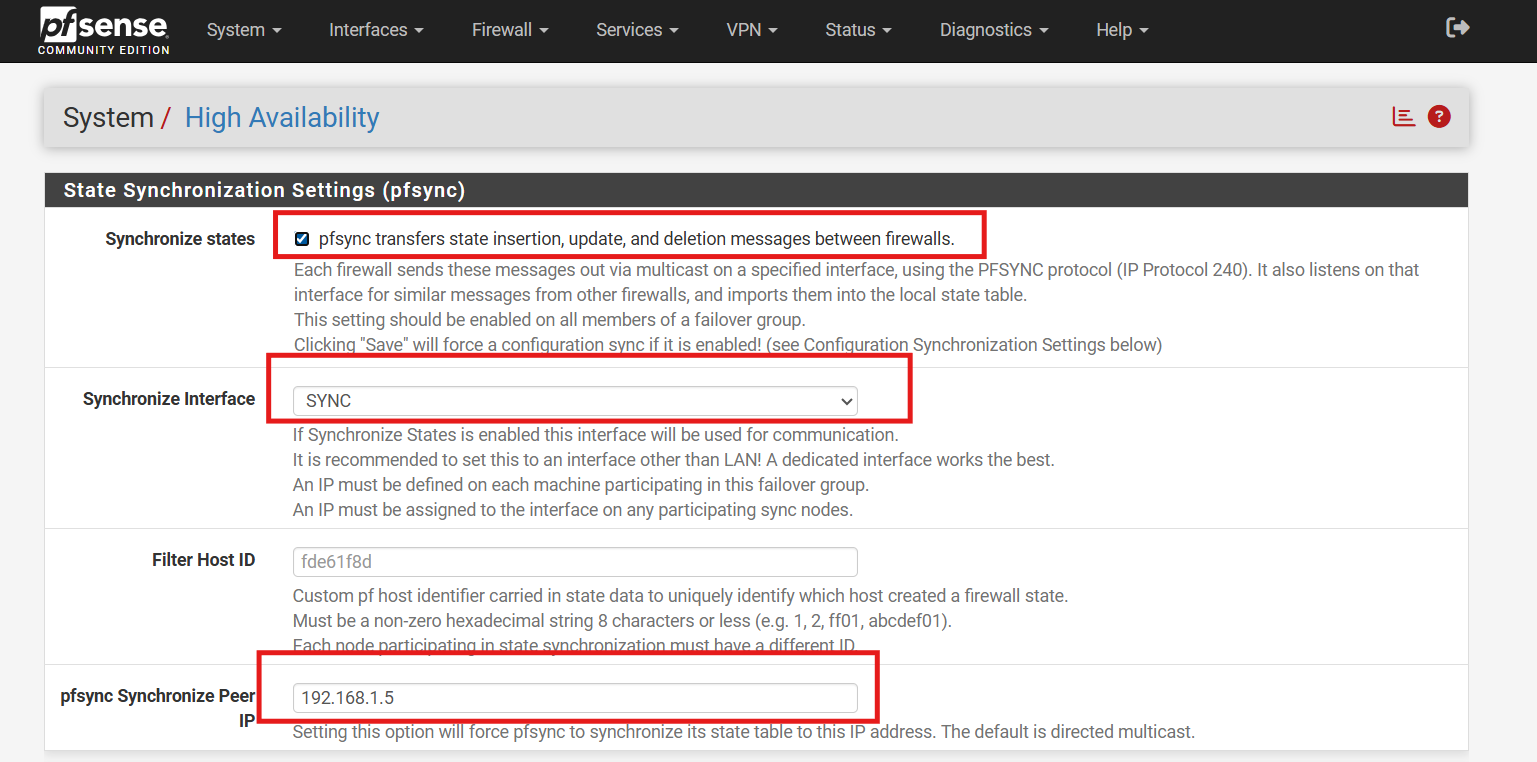
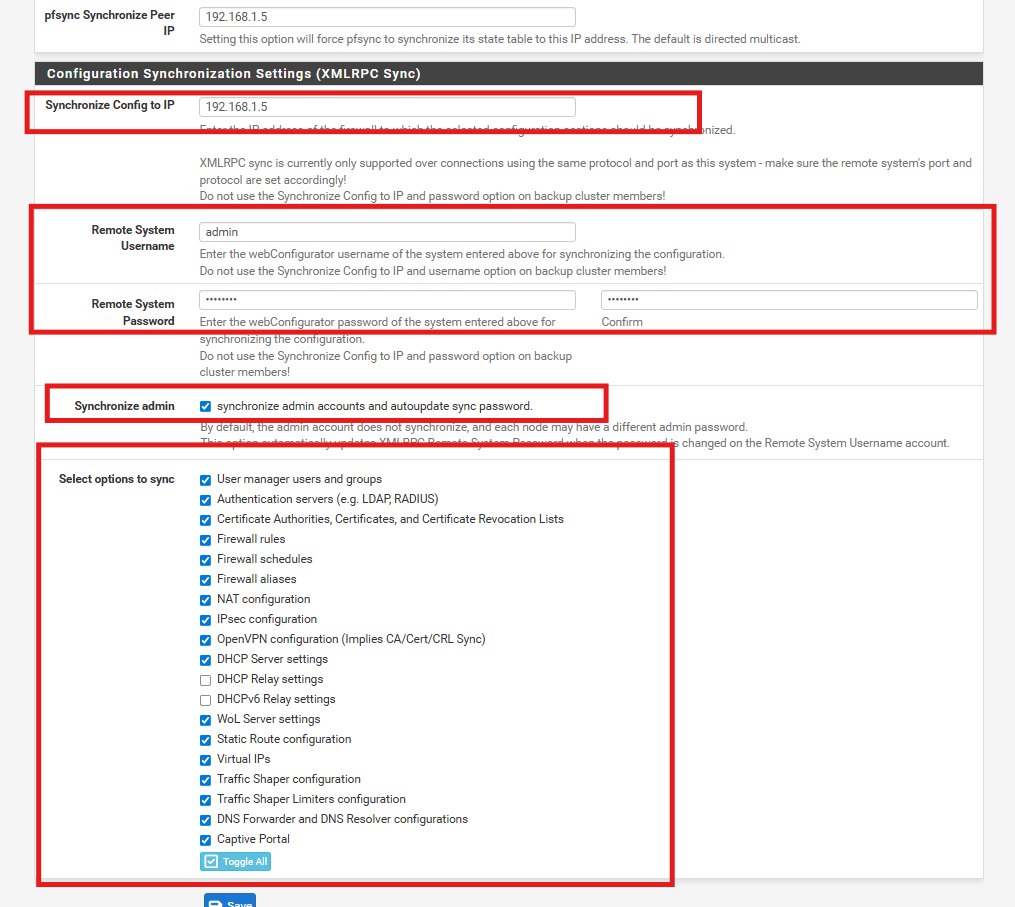
**Step 5: Configure HA (master firewall only)**
In the pfSense webGUI, go to **System → High Availability**.
Configure it as shown below.
Notes:
* **pfsync Synchronize Peer IP** and **Synchronize Config to IP**: enter the backup pfSense HA interface IP.
* **Remote System Username** and **Remote System Password**: enter the backup pfSense admin credentials.
* **Select options to sync**: select what you want to synchronize to the backup.
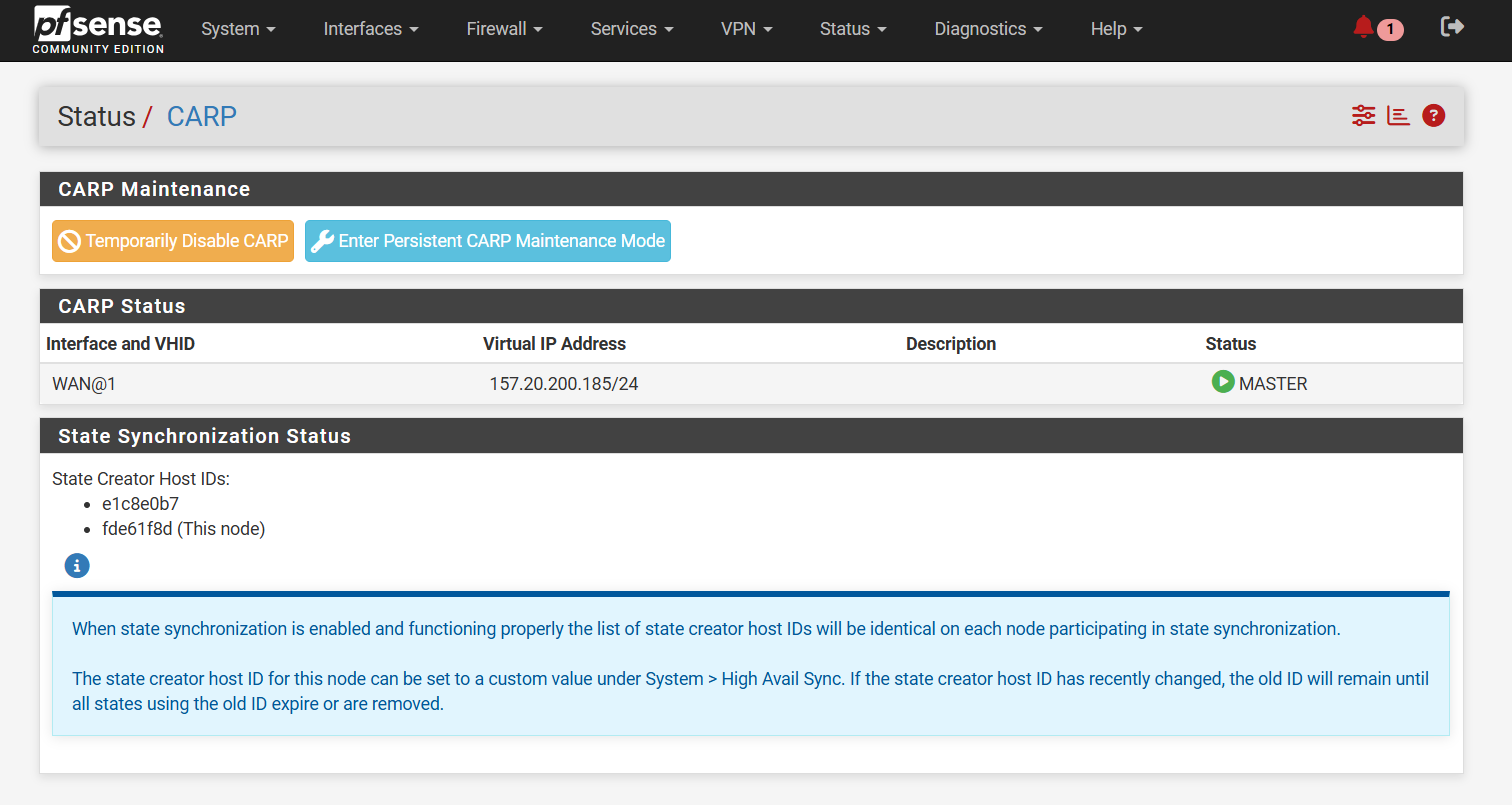
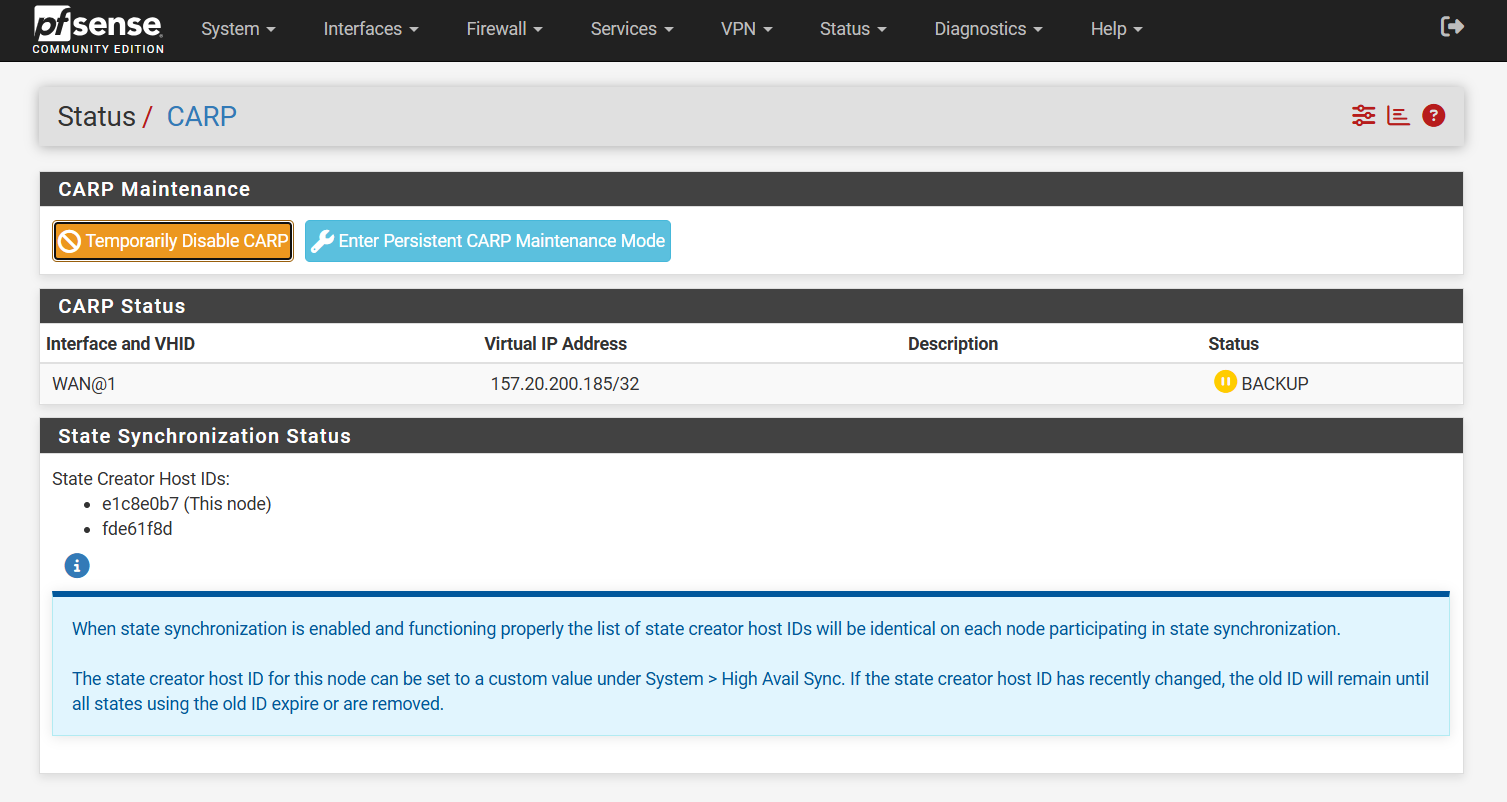
**Step 6: Verify**
In the pfSense webGUI, go to **Status → CARP (failover)**.
* On the **master** pfSense firewall
* On the **backup** pfSense firewall
CARP VIP on pfSense HA creates a shared virtual IP for the HA cluster.\
If the master firewall fails, CARP moves the VIP to the backup firewall automatically.
.png?alt=media)
.png?alt=media)
.png?alt=media)