> For the complete documentation index, see [llms.txt](https://docs.greennode.ai/llms.txt). Markdown versions of documentation pages are available by appending `.md` to page URLs; this page is available as [Markdown](https://docs.greennode.ai/vn/vmonitor/dashboards/metrics/lam-viec-voi-metric-agent/cai-dat-metric-agent-tren-server/window-os.md).
# Window OS
Để đẩy Metric về vMonitor, bạn cần cài đặt Metric Agent trên server, vMonitor sử dụng Telegraf Agent để đẩy metric về hệ thống, hiện tại Telegraf Agent hỗ trợ Service Account của IAM để xác thực và phân quyền, bạn thực hiện các bước bên dưới để thiết lập Telegraf Agent đẩy metrics về vMonitor
### **Telegraf Agent với Service Account**
1. **Tạo Service Account và gắn policy: vMonitorMetricPush để có đủ quyền đẩy Metric về vMonitor**
Để tạo service account bạn truy cập tại [đây](https://iam.console.greennode.ai/service-accounts):
* Chọn "**Create a Service Account**", điền tên cho Service Account và nhấn **Next Step** để gắn quyền cho Service Account
* Tìm và chọn **Policy:** **vMonitorMetricPush,** sau đó nhấn "**Create a Service Account**" để tạo Service Account, Policy: vMonitorMetricPush do GreenNode tạo ra chỉ chứa chính xác quyền đẩy metric về hệ thống
* Sau khi tạo thành công bạn cần phải lưu lại Client\_ID và Secret\_Key để thực hiện bước tiếp theo
2\. **Tải bản cài Agent Installer cho Windows**
* Truy cập vào link để thực hiện tải agent installer cho Windows :
3\. **Cài đặt installer với Client\_ID và Secret\_Key đã sao chép ở trên**
* Chạy agent installer đã tải ở trên
* Sau khi nhận thông báo, chọn **More Info**
* Sau đó chọn **Run anyway**, để bắt đầu cài agent
* Chọn **Next** để tiếp tục
* Nhập 2 thông tin **Client\_ID** và **Secret\_Key** đã sao chép ở trên vào 2 trường: **IAM\_CLIENT\_ID** và **IAM\_CLIENT\_SECRET**:
* Để mặc định, chọn Next để tiếp tục, hoặc nếu bạn muốn thay đổi thư mục cài đặt thì thực hiện thay đổi
* Chọn **Accept the license,** sau đó chọn **Next** để tiếp tục
* Để mặc định, chọn **Next** để tiếp tục, hoặc bạn có thể tùy chỉnh shortcut menu name cho agent
* Chọn **Install** để thực hiện cài đặt
* Chọn **Yes** để thực hiện grant quyền cho agent hoạt động
* Sau khi quá trình cài đặt hoàn tất, chọn **Finish**
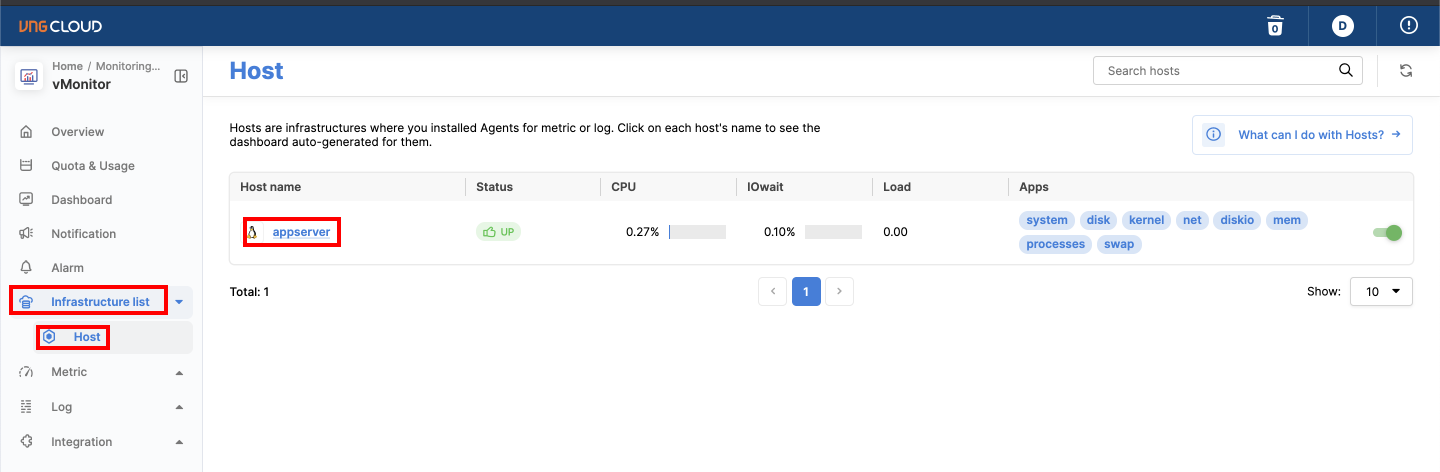
4\. **Sau khi cài đặt thành công bạn sẽ thấy server ở trang Infrastructure List/Host**
### **Telegraf Agent với API\_KEY (deprecated**)
{% hint style="info" %}
**Chú ý:**
* Chúng tôi khuyến cáo bạn không sử dụng phương thức này, trong thời gian sắp tới hệ thống của chúng tôi sẽ dừng hỗ trợ các API Key này.
{% endhint %}
B1: Tạo API Key (nếu chưa thực hiện tạo bất kỳ API Key nào trước đó )
* Truy cập vào portal vMonitor Platform Product:
* Chọn **Intergration** => sau đó chọn phần **API Key**
* Chọn **Create an API Key**, để thực hiện tạo mới (nếu chưa tạo bất kỳ API Key nào trước đó)
B2: Download Agent Installer
* Truy cập vào link để thực hiện tải agent installer:
B3: Install Agent
* Chạy agent installer
* Sau khi nhận thông báo, chọn **More Info**
* Sau đó chọn **Run anyway**, để bắt đầu install agent
* Chọn **Next** để tiếp tục
* Quay về Portal vMonitor Platform, ở phần API Key, **chọn** **biểu** **tượng copy**, để copy thông tin API Key
* Paste thông tin API Key vào phần nhập **Credentials**
* Có thể tùy chỉnh installation folder
* Chọn **Accept the license,** sau đó chọn **Next** để tiếp tục
* Có thể tùy chỉnh shortcut menu name cho agent, sau đó chọn **Next** để tiếp tục
* Chọn **Install** để thực hiện cài đặt
* Chọn Yes để thực hiện grant quyền cho agent hoạt động
* Sau khi quá trình cài đặt hoàn tất, chọn **Finish**
#### B4: Kiểm tra agent đã hoạt động
* Truy cập vào portal vMonitor Platform, chọn **Infrastructure list** => chọn **Host,** sau đó kiểm tra hostname của VM đã xuất hiện trong danh sách
* Chọn vào tên **Hostname**, để kiểm tra dashboard monitor