> For the complete documentation index, see [llms.txt](https://docs.greennode.ai/llms.txt). Markdown versions of documentation pages are available by appending `.md` to page URLs; this page is available as [Markdown](https://docs.greennode.ai/load-balancer/application-load-balancer/pool/pool-members/attach-pool-members.md).
# Attach pool members
This guide will walk you through the process of adding members to a pool in your Load Balancer. The administrative interface supports two ways of adding members:
* **Via Instances:** Members are specific virtual machines or servers.
* **Via IP Addresses:** Members are public IP addresses or IP addresses within the Load Balancer's subnet.
#### 1. Attaching/Updating Members as Available Instances
1. **Access the Load Balancer Homepage:** Go to `https://hcm-3.console.greennode.ai/vserver/load-balancer/vlb`.
2. **Select Your Load Balancer and Pool:** Click on the Load Balancer you want to configure, then select the "Pool" tab. In the pool list, click on the pool you want to attach/edit members to.
3. **Edit Pool Members:** In the pool details on the left, scroll down to the "Member Information" section and click "Edit Pool Members."
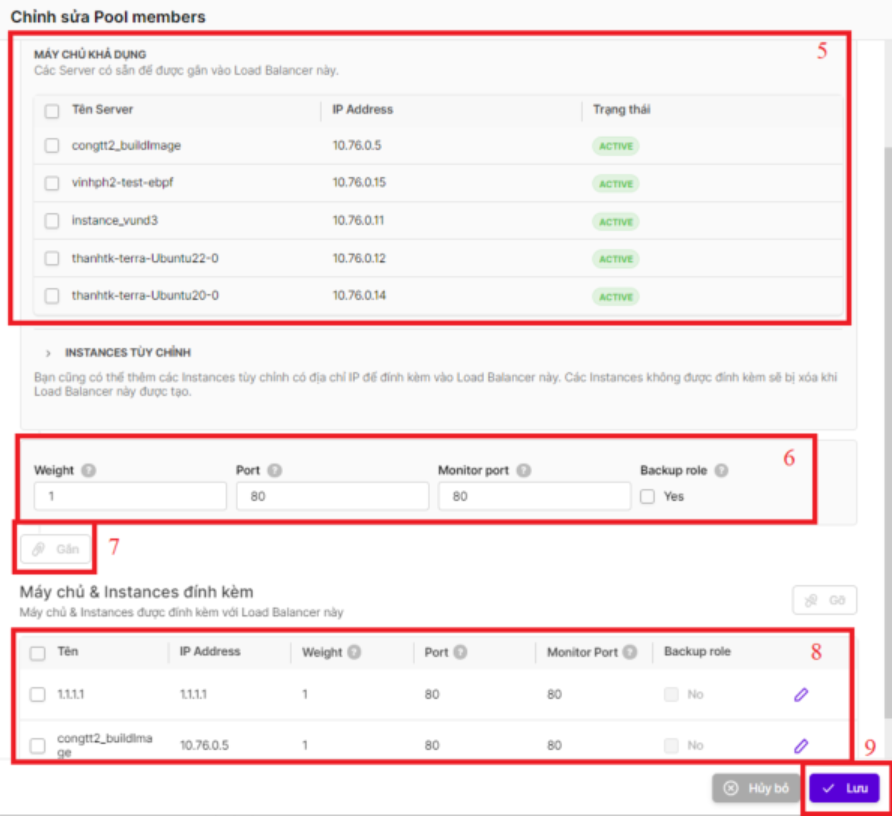
4. **Available Instances:** The "Available Instances" section will display a list of backend servers available within the Load Balancer's subnet.
5. **Select Instances:** Choose the instances you want to add as pool members.
6. **Configure Member Details:** Enter the Weight, Port, Monitor Port, and Backup Role for each selected instance.
7. **Attach Members:** Click "Attach" to add the backend servers as pool members.
8. **Review Pool Members:** Review the list of pool members in the "Attached Servers & Instances" section.
9. **Save Changes:** Click "Save" to finalize the pool member edits.
#### 2. Attaching/Updating Members as IP Addresses
In addition to attaching pool members through backend servers, you can also attach IP addresses as pool members. Follow these steps:
1. **Access the Load Balancer Homepage:** Go to `https://hcm-3.console.greennode.ai/vserver/load-balancer/vlb`.
2. **Select Your Load Balancer and Pool:** Click on the Load Balancer you want to configure, then select the "Pool" tab. In the pool list, click on the pool you want to attach/edit members to.
3. **Edit Pool Members:** In the pool details on the left, scroll down to the "Member Information" section and click "Edit Pool Members."
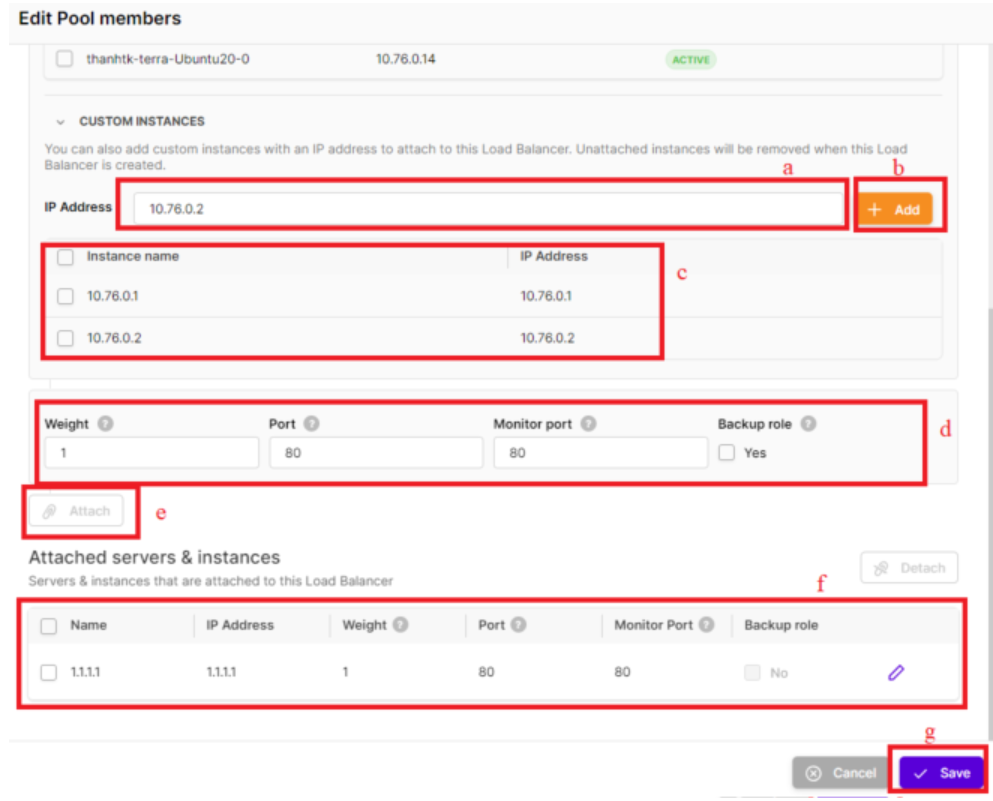
4. **Custom Instances:** In the "Custom Instances" section, follow these steps to attach IP addresses to the pool:
1. **Enter IP Addresses:** The IP addresses must be either public IPs or belong to the Load Balancer subnet.
2. **Click "Add":** Add the IP addresses to the Custom Instance list.
3. **Select IP Addresses:** Choose the IP addresses you want to attach from the Custom Instance list.
4. **Configure Member Details:** Enter the Weight, Port, Monitor Port, and Backup Role for each selected IP address.
5. **Click "Attach":** Attach the IP addresses as pool members.
6. **Review Pool Members:** Review the list of pool members in the "Attached Servers & Instances" section.
7. **Save Changes:** Click "Save" to finalize the pool member edits.
**Important Notes:**
* **Available Instances:** The list of available instances will only show servers that are in the same subnet as the Load Balancer.
* **IP Addresses:** Ensure that the IP addresses you enter are valid and accessible.